The following you should keep in mind when doing any of the Lighting & Electrical Projects
&/or trouble shooting to improve your 6066 GMC Truck's Lighting &/or Electrical systems.
These will work on other Vintage Traucks & Cars as well. Please keep in mind that I'm a
Journeymen Mechanic & have done some of these to my truck with no trouble, but I can make no
warranty to any work you do & can not be held responsible for any damage done to your truck
by adding any of these modifications &/or changes to your lighting &/or electrical system.
Also some of these projects are the work of Craig Ueltzen & Other owners of
National 6066 GMC Trucks Club.
Before you take on the projects, lets cover some basic electrical system maintenance. The number
one thing you need to work on your electrical system is a good wiring diagram. A wiring
Diagram id the road map to your truck electrical system. GMC put copies in the Operators &
Maintenance Manuals for these trucks. I have found them at swap meets & on eBay. Also you
will find diagrams for the projects listed on those pages..
The number one problem I have found in electrical systems is Corrosion &/or Bad Grounds. Don't
probe through the insulation on a wire, you will make a hole in it & water will get into the
wire & corroded it. Always check wires at the ends for power. Most broken wires are found with
in 12 inches of the end of the wire. Also look for broken or chafed wires, & loose connectors.
Use the right size wire for you project, & don't overload you stock wiring system. Newer products
like headlights pull more amps then their older conterparts. Check you wiring in your truck before
installing newer componants & up gread any or all that don't meet your needs for the project.
For salt corrosion try a product called SEALASTIC--it is a cork tape impregnated with an asphalt
type product--you mold the stuff around connections, switches, holes in the firewall etc, &
works great in back of light sockets to keep the gremlins out. It is sold in air conditioning
supply houses & better hardware stores---ever see the black stuff wrapped around house air
conditioning lines? That's the stuff. There is also a product called LIQUID ELECTRICAL TAPE,
brush this on wires & it sets up to a vinyl type seal -- total protection from the elements.
Now for your lighting system, if you lights look dim, take them apart & clean the inside of the lens
& the reflector. Also wipe any dust off the bulbs. Replace #1157 bulbs with #198, these are a
heavy service bulbs that will give longer life. Replace headlamps with halogen Bulbs.
If the reflectors are rusted, paint them silver.
Use the right size wire for you project & don't overload you stock wiring system.
Here are some wire sizes & the loads they can handle:
AWG = American Wire Gauge
Up to 5 amps: 18 AWG
Up to 10 amps: 16 AWG
Up to 15 amps: 14 AWG
Up to 20 amps: 12 AWG
Up to 30 amps: 10 AWG
Up to 50 amps: 8 AWG
Up to 65 amps: 6 AWG
Up to 85 amps: 4 AWG
The bigger the number, the smaller the wire. Using smaller wires then the above
ratings may stand the heat, but you will have voltage drop problems.
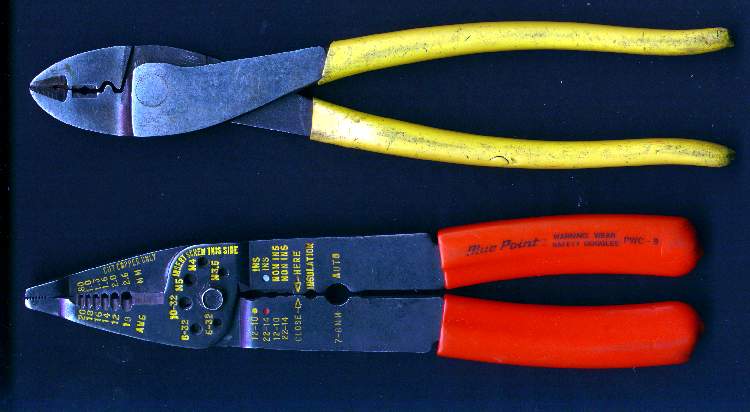
These are battle worn wiring tools. The top set is a pair of Klein crimpers, & the bottom set is a pair
of Blue Point strippers. Always use BOTH pairs when putting on wire terminals. One to
strip, & one to crimp. The thin steel strippers just don't do the job when it comes to crimping
terminals properly. The crimpers are wide, & have the right shape to make a good crimp.
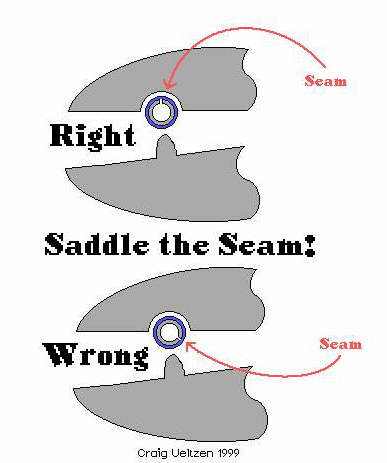
This is the right way to crimp terminals. It takes a little extra time to locate the terminal's seam, but
it makes a MUCH better crimp if this is done. Otherwise, the side of the seam gets mashed into the wire,
& it loses strength. This goes for all terminals, from rings to butt splices. Use this type crimp on
insulated terminals too. Ignore any arguments to the contrary, I've done it this way successfully for
more years then I care to count. Down at the Bus garage we use the non-insulated terminals & heat
shink tubing for most jobs. The tubing shinks down around the terminal sealing in from the elements.
Don't buy "1,500 pieces for $14.99" terminal kits. They are NOT worth it.
The cheap terminals have the tinsel strength of wet toilet tissue. Try them,
make a crimp, then pull on the wires. Pop goes the weasel.
Use 3M terminals. They are more expensive, but they won't come apart easy.
Never, use a butt splice under a floor mat. They will corrode & fall apart in a few months due to
moisture. If you must fix a broken wire under a mat, cut the wire off until it is above the mat, then
re-run a new piece through to the other side to get it above the mat also. If you ran out of wire, & are
splicing under the mat to make it longer, shame on you. Rerun it!!
Don't use 'Scotch Taps' in wet or moist areas, These are the type of tap-in terminals with the blade inside
which cuts through the wire & slides alongside the conductor. You install them with a pair of pliers to
squish them onto the wire. These last a few weeks to months before galvanic action corrodes the connection.
They are famous for being intermittent down the road. I only use them for temporary wiring of in dry areas.
Whatever else you may do, don't ever, change wire colors as you go along. ie: red connects to blue, then green,
then brown, then comes out on the other end of the bundle, white. Unless, of course, you are planning on
driving someone stark raving mad as they later try to figure it out.
A rule of thumb when adding wiring for stereos & the like. Always find & follow the factory's wiring course.
They obviously knew what they were doing because the wires are still there & good. Don't caddy-corner
across the floormat. Feet on the floor will rub the insulation off until they short to the floor. Also,
exhaust pipes make it hot under the mats, & wires can melt.
Always look for moving parts when running new or updated wiring.
Don't tie wrap to the brake petal swing brackets or accelerator linkage.
Use grommets to run through holes in sheet metal. Don't just tape the wire & hope.
For big holes, get wire loom & put the split seam into & around the hole's edge.
You can create large 'grommets' this way.
Chop up a 12 gauge extension cord for runs under a truck & for trailer wiring. You get 3 wires, black, white,
& green, & the outer sheathing & braiding is much tougher than taped wires. It will take quite a while
for all the layers of insulation to fail from rubbing against the frame.
~ 6066 GMC Trucks ~ 6066 GMC Trucks ~ 6066 GMC Trucks ~ 6066 GMC Trucks ~ 6066 GMC Trucks ~ 6066 GMC Trucks ~ 6066 GMC Trucks ~ 6066 GMC Trucks ~
|
|
Lighting & Electrical Projects
|
|
|
|
|
|
~ 6066 GMC Trucks ~ 6066 GMC Trucks ~ 6066 GMC Trucks ~ 6066 GMC Trucks ~ 6066 GMC Trucks ~ 6066 GMC Trucks ~ 6066 GMC Trucks ~ 6066 GMC Trucks ~
© 2000-2005 6066 GMC Trucks. Last Updated April 15, 2005.